Dynamic navigation menus in WordPress are nothing new. Many great plugins currently tackle this functionality. However, menus as we’ve known them will be changing due to the Block Editor and especially with Full Site Editing on the horizon. WordPress navigation will soon be handled entirely with blocks and a new “modern” solution is needed.
This tutorial will show you how to build a simple dynamic menu using the new Navigation block and the 100% free Block Visibility plugin. With just a few clicks, you will be able to display a “Log In” menu item to all logged-out users and a “Log Out” menu item to all logged-in users. This functionality is essential for many websites, including this one!
Note that this tutorial applies to the Block Editor, also known as Gutenberg. Block Visibility was designed exclusively for blocks and does not work in the Classic Editor.
Furthermore, core WordPress does not yet include the Navigation block as of version 5.8. The block is available via the Gutenberg plugin and will be added to WordPress in the future, likely version 5.9. So while this tutorial may not currently apply to your website, it definitely will soon, and we wanted to showcase just how powerful this functionality can be for early adopters!
Why Create Dynamic Menus in WordPress?
There are many reasons why you might want a dynamic navigation menu on your website. Here we will be demonstrating a very basic example with login/logout links, but the applications are endless. Here are a few examples.
- Only display resource links (Account, Past Purchases, Subscriptions etc.) to logged-in customers or members.
- Add a time-based promotional menu link. For example, an “Enter to Win” link that is only visible during the promotional period.
- Show or hide menus based on the screen size of the current user’s device to improve the user experience of your website.
- Create unique menu links based on Query String parameters. Great for running promotions.
How to Add Dynamic Login/Logout Menu Links
In this example, we will be creating a navigation menu in the Block Editor using the Navigation block. As a quick reminder, you need to have the Gutenberg plugin installed. The block will likely be included in WordPress core in version 5.9, which is coming later in 2021.
Step 1: Create the Navigation Block
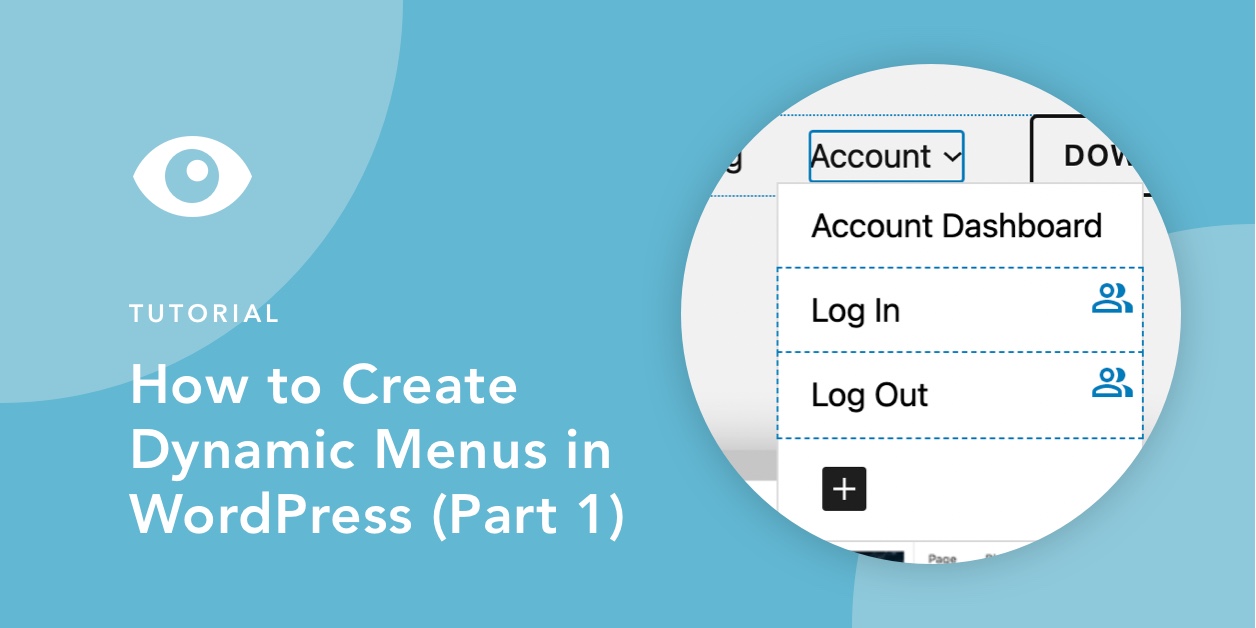
Add the Navigation block to the Block Editor where you would like it to appear. Create all necessary menu links beside the “Log In” and “Log Out” links. Depending on your unique menu, it should look something like the following screenshot. Here we are using this website (blockvisibilitywp.com) as our example.

Step 2: Add the Login/Logout Menu Links
Next, add the “Log In” and “Log Out” links to the navigation menu. You will want to choose the Custom Link option when adding each link block.

The login and logout URLs for your website are generally the following:
-- Login --
https://www.yourwebsite.com/login/
https://www.yourwebsite.com/wp-login.php

-- Logout --
https://www.yourwebsite.com/wp-login.php?action=logout
You can also refer to this great post by Kinsta on how to find your WordPress login URL if your WordPress site is installed on a subdomain or if you have a more advanced setup.
Step 3: Make the Menu Links Conditional
Finally, we need to make the “Log In” and “Log Out” links conditional using the User Role control in the Block Visibility plugin.
Select the block for the “Log In” link and navigate to the Visibility panel in the Settings Sidebar. Ensure that the User Role control is enabled. Then select the “Logged-out” option. We want the link to be visible to all users that are logged out of our website.

Repeat the process for the “Log Out” link, this time choosing the “Logged-in” option from the User Role control. When finished, both links will have conditional indicators in the Block Editor.

Finally, just update the page. Pretty simple, right?
Now on the front end of the website, the navigation menu will dynamically show one of the links depending on the status of the current user. Take a peek at the menu on the top of this page. You should only see “Log In” under the “Account” menu item. The “Log Out” link has been hidden since you are not logged in!
We hope this article has shown you just how easy it is to create dynamic menu links in WordPress using the Block Visibility plugin. If you haven’t already, download the plugin for free on WordPress.org.
In next week’s tutorial, we will dive deeper into dynamic menus and highlight more advanced functionality. If you want to stay updated on all future tutorials and plugin news, please consider subscribing to our YouTube Channel or following us on Twitter.
Until next time…


Share Your Thoughts